Wednesday, September 26, 2012

Sketching with Beast'sbelle: "Portrait of a Lady" ;)

Hey guys, sorry I've been MIA for a while.  My mom, sister-in-law, and I all had our combined birthday family dinner on Saturday, and things just haven't really slowed down since then.  Plus, this was one of those weeks where I've been behind on everything:  housework, the checkbook, blogging...you name it.  So instead of being responsible, stepping up to the plate, and getting stuff done, I chose to pig out on Weight Watchers ice cream bars and try out a new TV show, playing the total avoidance card.  Disappointing, I know.  I just like to remind you guys that I'm not perfect...I've got my issues to work on, too.  Thankfully, the Lord doesn't give up on me! (I sure would have by now!) ;)

Anyway, tonight I set aside some time to sit and sketch with my daughters.  It was so fun spending time with them, watching them create their own masterpieces, and teaching them by example.  It's been a while since I've taken the time to draw.  I really enjoyed myself. :)  I thought you guys might like to see what I ended up with. :)

So here's what I started with.  I was kind of going for the Regency period with the hairdo, albeit ultra romanticized. ;)  Hey, it was just for fun.  I'm not an art major or anything. :}

Details of the face...

...and the roses.

I went over the entire drawing in pen, which was quite a process.  Any of you who have ever used a ball-point pen to trace a drawing on sketch paper will feel my pain. ;)  I was especially frustrated trying to outline the roses!  

When I had outlined everything, I erased the pencil underneath.

Now for some color!  I decided to use colored pencils this time around.  I started by adding a light pink shade to her cheeks and a slightly darker shade to her lips.

Next I filled in her skin color.  After this picture was taken, I added some extra shading to her skin tone to make it more lifelike.

To add some definition to her eyes, I used light brown on her eyelid.  I colored her actual eyelid darker and gradually colored lighter until I reached her eyebrow.

I used green, blue, and brown for her eye colors.  I was going for a hazel effect.

Her hair was next.  I lightly colored a reddish brown underneath and then used the dark brown pencil to go over it.

Her headband and shawl came next.  I used various shades of blue.

For the finishing touches, I colored in the roses and used a goldenrod colored pencil for her earring and necklace.  

I'm pretty happy with the way she turned out, although her hair ended up a little wilder than I had originally planned. :}  Also, her ear is a bit off as far as placement, but the ear itself turned out pretty awesome!! :D

I'm normally super intimidated by ears, so I usually draw girls with long hair that covers their ears.  Tonight, I asked Middle Gal to model her ear for me. ;)  She did a super job...that's the best ear I've drawn in a long time! :)

Here are a few more detail shots: 

I'm not 100% satisfied with the roses, but I suppose they'll do for this time.

I think this red one is my favorite.  I didn't like how bright the red colored pencil was in this particular set, so I used the black colored pencil to tone the red down a notch.

Overall, I'm very pleased with how it turned out.  I've missed drawing just for the fun of it. :)  Plus, it's good for my ego.  My daughters have informed me that I'm the best artist in the world. ;)
Thursday, September 20, 2012

Random Updates for September

It's that time again...time for me to get all of you up to speed on a few things. ;)

So for starters, I'm only 3 pounds away from my goal weight!! :D  It's been a long haul, with a lot of trial and error, but I'm finally to the point where I really see a difference (and don't cringe every time I see a picture of myself). ;)

I was hoping to reach goal weight this last week, but I actually went up .4 instead of losing.  That might or might not have something to do with the platter of popcorn shrimp and fries I shared with one of my daughters on Sunday...and the Sonic burger I had the night before weigh-in day. :}

Anyway, I'm getting there.  I think the most important thing I've learned over the past few months is to not beat myself up when I have a setback, but to shrug it off and move on.  I'm also allowing myself a few indulgences every once in a while, which is the thing I really love about Weight Watchers.  Using the points system, you can plan for any food you want (within reason, of course, and perhaps in smaller quantities than you would like, but still...). ;)

Once I've reached goal weight, I'd like to figure out a way to show you guys the difference without showing my face.  There are some bloggers who take a picture holding an open book in front of their face, so I might try something like that.  We'll see. ;)

I recently took a bit of a "media hiatus", taking a break from movies, TV, and YouTube (anyone else here end up on YouTube rabbit trails that end up lasting for hours?). :}  It was a good time to reevaluate my priorities and make sure I wasn't wasting all of my time.  One thing I'm trying to work on this month is setting aside time for my devotions every day.  With the early mornings and travel back and forth of school days, I'm finding that carving out that special time is getting harder and harder.  It's so important, though.  I see such a difference in my life and my children's lives when we're in the Word daily.  One of the reasons I took my hiatus was to help me make time for my Bible reading.  I haven't perfected it yet, but it's getting better. :}

In other news, my birthday is a week from Friday!  My mom's birthday is tomorrow, and my aunt's birthday is coming up in November.  To celebrate, the three of us are planning a weekend shopping trip sometime in mid-October.  A kid-free shopping trip, no less! :D  It's pretty likely that this trip will include a stop at a Disney Store, if not more than one!  As you can imagine, I'm super excited about that and already have a list of things I'd like to look for (thank you, eBay sales!!). :D

We actually came really close to going up to Seattle this past week, which would have included my first trip ever to an American Girl Place.  Unfortunately, even though we'd been planning it since mid-July, there were just a few too many things that came up for all three of us that made us unable to go.  Maybe next year! ;)  And for now, we have our smaller trip that will help make up for it. :)

Let's see, was there anything else?  Oh, I got over 1,000 words typed on my story this past week.  It's the first time I've made myself sit down and consciously work on it in a few months, so that was a big accomplishment. :)  I'm falling in love with my characters all over again, and can't wait to introduce them to the world.  It's hard to be patient.  I'd love to give all of you a detailed synopsis, but I know that it will be much sweeter to wait until the story is ripe and ready for everyone to see it. :)  I'll be sure to keep you posted on any updates.  My short-term goals are to get the first book's rough draft finished within the next few months and to attend a writer's conference this March (or April...I can't remember which!).  As always, I'm so thankful for my local writing group that has provided so much encouragement throughout this project.

I have several posts that I'm still trying to work through, so you should see a lot of reviews coming up.  Also, Emma wanted me to apologize for the fact that she has not gotten a post up yet on Jane Austen and Unicorns.  Although really, I should be the one apologizing.  Between my eBay sales and tearing the house apart to rearrange my daughters' rooms, Emma and the others haven't had much of a chance to get to the computer. ;)

I guess that's about all for now.  Thank you for all of the pageviews and followers.  It amazes me every time I come on here and see the numbers increasing.  I've really enjoyed all of the emails I've been getting, too.  You guys make my day! :D

Talk to all of you again soon. :)

Tuesday, September 18, 2012

New Fall Releases at Disneystore.com! :D

Hey guys!  Sorry it's been a while since I've done a regular post.  I've been busy shipping my eBay sale items and (once again) rearranging my house.  We recently decided to give my oldest daughter her own room, so it's been quite a chore figuring out where to put everything. ;)

I got an email from the Disney Store this morning, announcing their new releases for the fall, so I just had to share. ;)  You can see all of the fun new things HERE.

I thought I'd mention that among the new releases are some of the "Designer Villains" dolls.  It looks like they just have the Evil Queen from Snow White and Maleficent from Sleeping Beauty so far.  I personally have absolutely no interest in adding villains to my collection, but I knew this would interest some of you out there.   ;)

Here are a couple of the items I am interested in from the new releases, though:

First off, hurray for a beautiful "Tangled Ever After" Christmas ornament! :D  It's so nice when they actually make Rapunzel with her short, brunette hair.  It's a cute pose of the two of them, too. :)  This one will definitely make its way to my home eventually. 


I also liked this "Tangled" Tower ornament.  Not quite as exciting as the first one, but it's still cute.


And once again, hurray for a wedding Rapunzel doll that actually has short, brown hair!! :D  This one is being released with the classic 12" doll line (without a wedding Eugene).  As far as I can tell, she has the new poseable legs and arms.  She also has the newest Rapunzel face paint.  This gal will definitely be part of my collection, too. :)  Oh, and while we're on the subject of Disney Store's 12" dolls, all of the regular ones are on sale for $10 each right now.  They're normally $14.50 each, so it's a great time to grab your favorites. :)

The other new releases I enjoyed were some Christmas ornaments that capture some of our family's favorite movie moments or characters:

Buzz and Woody, "falling with style". ;)

Sully and Mike from "Monsters Inc."

Berlioz, Marie, and Toulouse (I think I gave the two boy kittens their correct names!) from "The Aristocats". My girls absolutely love this movie. :)

Jaq and Gus in Cinderella's glass slipper.

Chip and Dale.  This ornament reminds us of one of our favorite Chip and Dale episodes:  "Working for Peanuts".  

Well, I'm off!  I'm filling in for one of the office secretaries at my daughters' school today, so I don't have much time.  Hope you all enjoy browsing through the new releases.  I'll be back soon with more posts! :)


Tuesday, September 11, 2012

May We Never Forget

In the hustle and bustle of our schedules today, let's not forget the many lives lost on this day 11 years ago.  Let's remember the brave firefighters, policemen, and many others who stepped up to a horrific challenge and became everyday heroes.  And let's offer up a prayer for the families still hurting from the aftermath of losing loved ones in such a horrible way.

May we never forget.

Saturday, September 8, 2012

MOTHER GOTHEL IS NOT AMUSED...


...and she has informed me in no uncertain terms that whoever had the audacity to dress her in such ridiculous get-up and then ABANDON her with a group of pathetic, castoff toys at Goodwill shall SURELY PAY for her crimes!!

I'm sorry, I couldn't resist.  I mean, finding Mother Gothel in this outfit with that disgusted sneer on her face...hee hee.

Okay, in all seriousness, I wanted to let you guys know that I finally got my act together and got some eBay listings up, which just so happen to include Miss Vengeful herself.  Eugene and Rapunzel would never forgive me if I actually kept a Mother Gothel doll.  And yes, I realize that there will likely be a target on my back as well now. ;)  I tried to explain to her that I was going to find her a good home where she wouldn't feel the need to wreak havoc on everyone's lives, but she would hear none of it.  

Anyway, I have several eBay listings, but there are also some items I decided to list on AGPlaythings to avoid all of the eBay listing fees. :}  Since some of the things I listed there were items that some of you expressed an interest in (including my Hearts 4 Hearts Lauryce doll), I thought I'd try a little experiment.  I'm providing a link to the Picasa album that has pictures of all of the non-eBay items I'm selling.  So click HERE to see everything.  

Now, here's the deal.  For non-eBay transactions, I accept Paypal only.  In order to use Paypal, you must have a Paypal account (just thought I'd mention this to save you some headaches later on).  You must be at least 18 years old to purchase from me (for your safety as well as mine). If you're younger than 18, you will need to have a parent or grandparent purchase for you using their Paypal account.  Also, I am not able to do International shipping at this time, so these items are only available for those of you in the US (sorry to all of my International readers!).  Also, all prices do NOT include shipping.    

If you see an item you're interested in, or if you have any questions about an item, please email me at nevergrowup.beastsbelle@gmail.com.  It would also be helpful if you could email me your zip code so that I can estimate what shipping will be.  All items are on a first-come, first-serve basis, and have already been listed on AGPlaythings, so I cannot guarantee that everything you want will be available.  However, I will do my best to update the album as things sell.  

And while you're at it, be sure to check out my eBay listings, too!  You can see all of them HERE.  I have lots of great stuff, including some nude Barbies for OOAK projects, happy meal toys, tons of LIV dolls, a Princess Luna pony, a TLC Moxie Teenz doll, and more.

And of course, Mother Gothel is waiting there too.  So if any of you have been wanting a delightfully evil diva to add to your collection for a reasonable price, here's your chance! ;)  However, she will not be in her current garb.  She will actually be without clothing.

Which brings me to my last point.  I have to apologize ahead of time for the large number of naked fashion dolls in my eBay listings.  I just flat out didn't have enough clothing to go around this time.  Sorry if this offends any of my readers. :{     


P.S.  Wowee!!!  I just looked at my stats and saw that I've officially gone over 200.000 pageviews!! :D  You guys are awesome. :)


Friday, September 7, 2012

Disney Princess and Me Rapunzel Braid Tutorial

I'm finally getting around to my tutorial for my Disney Princess and Me Rapunzel's braid.  Sorry it took me so long to get to this post! :{

To do this braid, you'll need a wire doll or wig brush, a doll-sized spray bottle (I really like the American Girl one pictured here...it gives out just the right amount of spray), and some hair rubber bands.  I picked these ones up at Dollar Tree.  However, I've found that these bands are sometimes better quality if you pay a little more for them.  It depends on the batch, too.  Some of my Dollar Tree ones work great, while the ones I purchased recently tend to break easily and only last for a week or so.  :(

Here's a before picture of Rapunzel's hair, right after I'd gotten it as detangled as I could.

I took a couple of pictures to show her one dark strand of hair.  Not entirely movie accurate; in the movie it was shorter than the rest of her hair.  But whatever.  Moving on. ;)

A side view of her dark strand.

After all the time I'd spent working on her hair, I wanted it to stay nice (and pretty much NEVER wanted to have to brush through it to that extent again!!), so I decided to braid it.  I wanted it to be a special braid, though.  I was hoping I could get it to look as close to the movie version as possible.

After searching Google images for pictures of Rapunzel's braid and getting a feel for what it looked like in the movie, I found some pictures of humans and Rapunzel dolls with braids like the one in the film.  After I saw the above picture, I had my inspiration and got started.  (You can see the original site this picture was taken from HERE.)

I started by separating the left side of Rapunzel's hair.   I wanted to leave some hair in the front for her swoopy, side-bang look, so I started with that.  Then I took a smallish section from behind the front hair...

...and braided it into a small, tight braid.  (Here's where the brush and spray bottle came in.  Too keep things as untangled as possible, I spritzed her hair lightly and then brushed it before braiding, and repeated this process throughout this entire hairstyle. )

I braided it down as far as I could and secured it with a rubber band.

Then I turned Rapunzel around and did the same thing on her right side, trying to get the braid on this side as close to the same spot as the previous one as I could.

Just like I did with the first braid, I made this one small and tight.  I braided it as far as I could and secured it with a rubber band.

I knew that I wanted one more small braid on each side of her head, so I gathered a small section of hair just a little farther down from the first braid, about in line with Rapunzel's ear.

As before, I braided it as far down as it would go and then secured it with another rubber band.

I then repeated this step on the other side.  (I think this second braid ended up a little higher than the other side!) :}

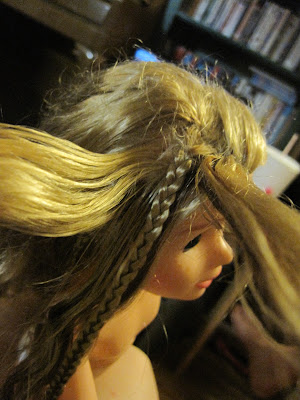
This next part took some trial and error, but I finally figured out how to get the look I wanted. ;)  Starting on one side of her head, I took three sections of hair from the front so that I could do a bigger, thicker braid.

I included the top tiny braid in these sections, always making sure to keep it in view as I braided the hair.

The end result looked like this.  You'll notice that I kept the second tiny braid behind the thick, side braid.  I'd use that later.

I continued the thick side braid until I couldn't go any farther, and then secured it with a rubber band.

Then I repeated this step on the second side of her head (the small braid in this picture is the one I included in the thick braid...the one that would hang loose is behind her hair and not visible in this picture).

And here's the finished braid on the second side.

Next, I took a large section of hair from the back of her head and pulled it behind her, keeping both the thick braid and the tiny braid in the back.

Here's another picture for clarity.

I did the same thing on the other side as well.

When I was happy with the amount of hair I had, I twisted it ever so slightly...

...and attached a rubber band.

This is how it looked.  And now, I was ready for the main braid.  I divided the hair into three sections, keeping the thick braids on the two outside strands of hair.  I did NOT include the small braids in this big main braid.

From there I braided, once again trying to keep the thick braids as visible as possible in the main braid.

When I had braided as far as I could, I secured the (slightly crooked) braid with a rubber band. :}

As a finishing touch, I took the two leftover tiny braids and wrapped them around the main braid in a criss-cross fashion.

And here's what it looked like when I was done!


To dress it up even more, I added these fake flowers to her braid.  I found these on a bouquet at Goodwill, as I mentioned in my earlier post.

I think it adds the perfect touch. :)


I hope this tutorial was understandable.  Sometimes it's hard to explain how you did something after the fact. :}  Feel free to comment if I wasn't clear enough on some parts or if you have any further questions.  If you try this on some of your dolls, I'd love to hear about it! :)  You could even email me a picture at nevergrowup.beastsbelle@gmail.com! :)

To see my original Rapunzel review, you can click HERE.