
So, now that you're all excited to join the insanity, here's what you will need:
>a doll with loose legs (of course) ;)
>2 Goody brand ouchless thick hair bands (see pic), available at Walmart or other stores
>scissors
>a hairdryer (possibly-we didn't end up needing it)
>brass inserts/sleeves from a hardware store (2 for EACH loose limb)
>pliers or a crimping tool
>a strong husband or dad who is willing to help (I would highly recommend this!!)

(sorry, I realize not all of the supplies are pictured) :}
Before I start, I'd like to mention just a few things. First, I tried this project after watching stephenswodadancer's incredibly helpful YouTube video on re-stringing dolls. I've included a direct link to her 3 part re-stringing video HERE. I don't know about you guys, but I'm an extremely visual person, so having a video to follow is always helpful. Be sure to check it out. Once again, thanks Sarah (aka stephenswodadancer) for all your wonderful "how to" vids!! :)
The other thing I wanted to mention is that it was next to impossible to find the brass inserts for the doll legs!! I went to both Home Depot and Lowes, armed with the name of the brass inserts Sarah held up in the video, determined to be confident. You have to understand, I have a complete inferiority complex when it comes to hardware stores, so I always want to know exactly what I'm looking for ahead of time. Otherwise I feel like the helpless little housewife who's completely clueless!! Imagine my embarrassment when, after wandering around for a while with no success, I worked up enough courage to ask a sales associate, and he had no idea what I was talking about! This happened at both Home Depot and Lowes. By this time I was pretty discouraged and decided I'd go home and watch the video again to make sure there wasn't something I was missing.
Thankfully, my wonderful hubby watched Sarah's video with me and headed to Ace Hardware. He returned with the inserts. What a guy! Apparently, I'd been looking in the wrong section. So, if you go to look for these, be sure to check in the plumbing section, not in the aisle with the screws, nuts and bolts.
I also wanted to say that for this first part, we used the crimpers instead of pliers. I'm thinking I'll probably try pliers for the other leg so I have a good comparison. The crimpers bent the brass easily, but sometimes they bent it TOO much. My hubby actually broke through one insert completely.
Wow, that was a long-winded intro! Sorry about that. Wordiness is one of my worst flaws! :} On to the pics!
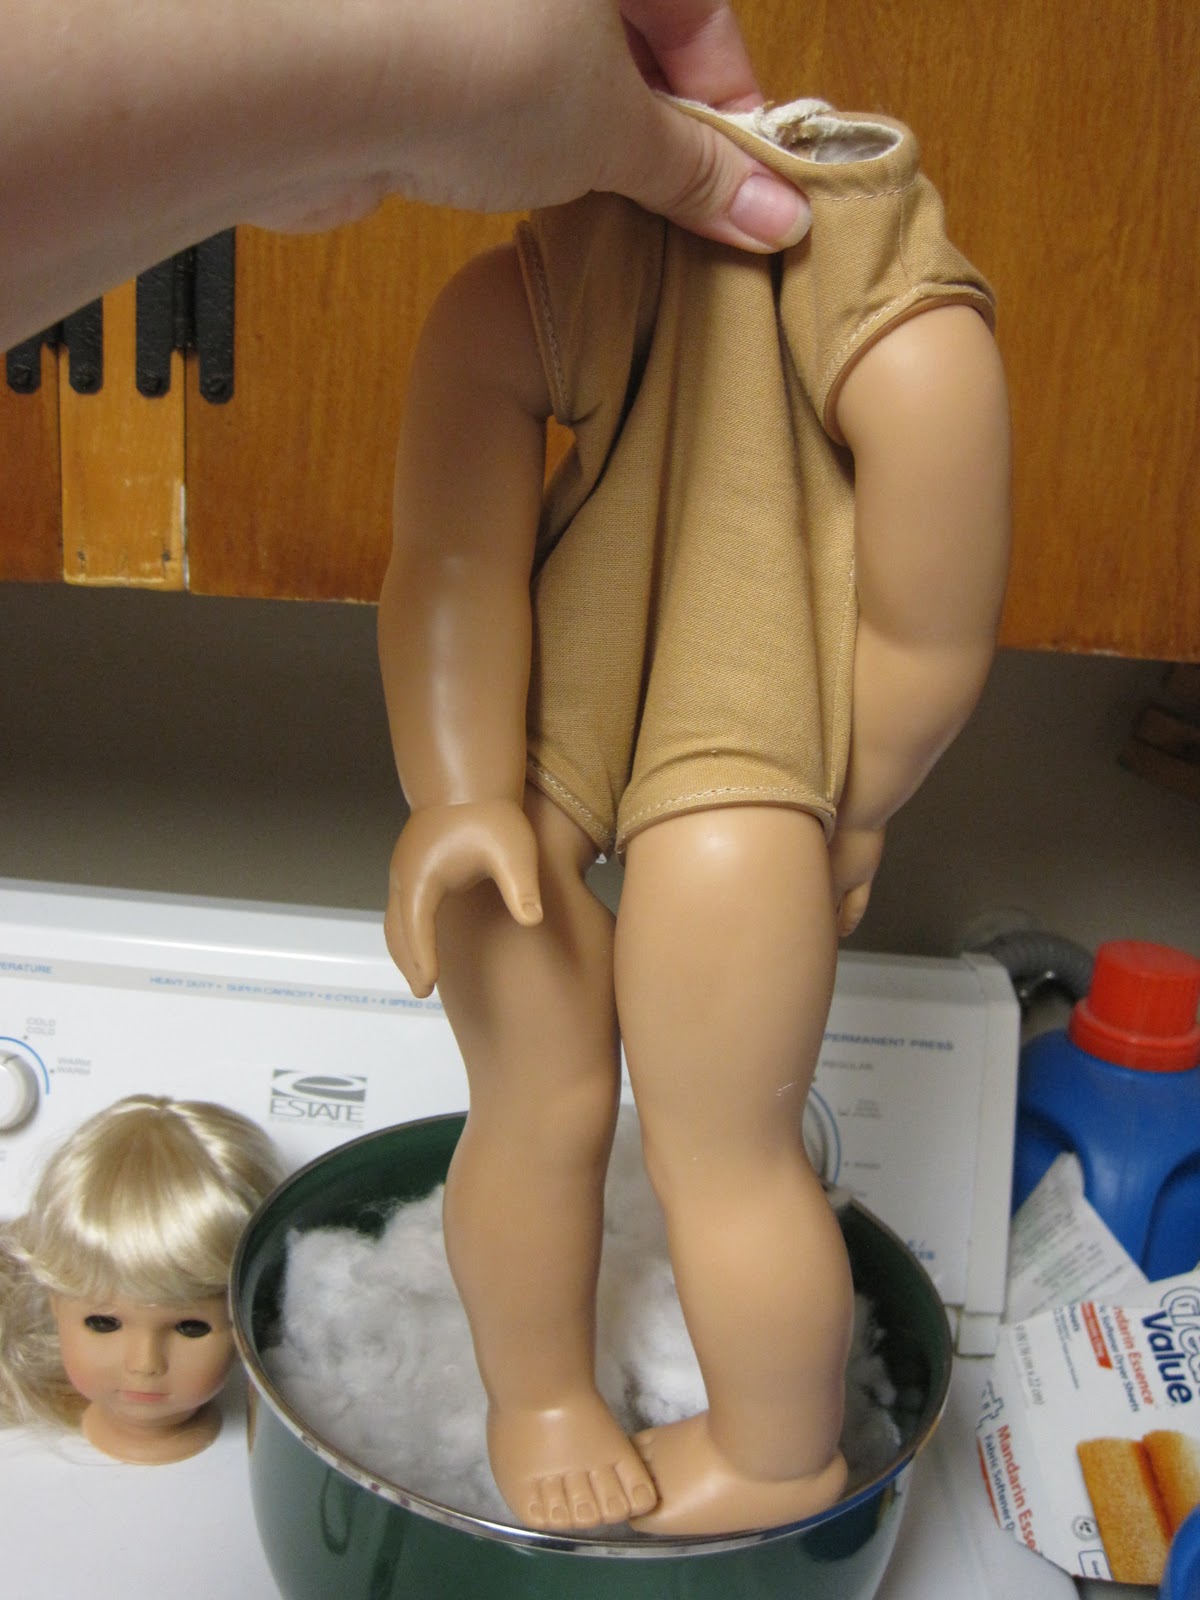
Here's a pic demonstrating Emily's need for new leg strings. :)

The first step is to untie your doll's neck strings. It was a little tricky getting Emily's knot undone because it was so tight, but eventually it came loose.

After the doll's neck strings are untied, remove her head (and try not to panic). :)

Next, begin removing the stuffing from inside the doll's cloth body. There is A LOT of stuffing crammed into these dolls...I'm not particularly looking forward to putting it all back in. :{

Here's a pic that shows how much stuffing was in Emily's body...

...and here's a pic of her body sans stuffing!
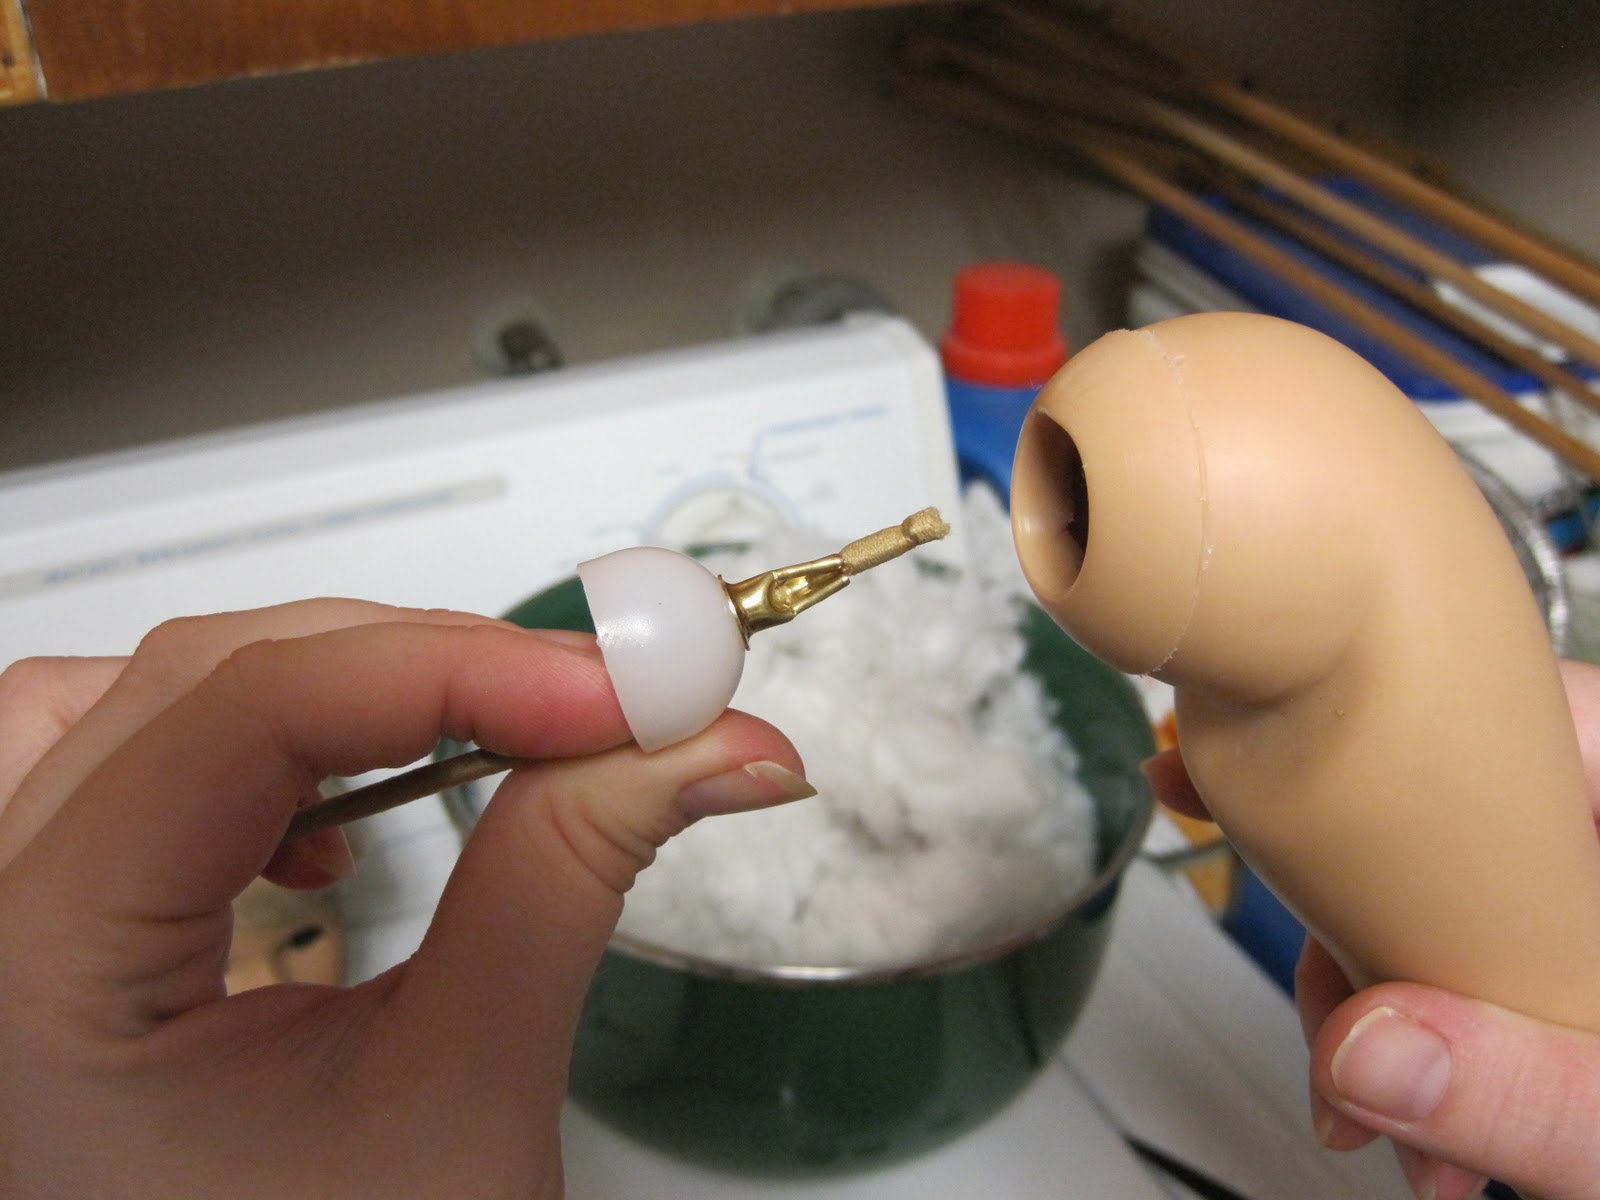
Once the doll's stuffing is removed, find the limbs inside and cut the elastic attached to the loose limb. There will be a white plastic cup attached to the elastic. Set this aside for later.

Look inside the doll's leg. You'll see a white plastic cup and the other end of the cut elastic. You can remove the elastic piece by shaking it out.

To remove the plastic cup, use your pliers or crimpers to grab hold of one of the cup's edges (this is where my hubby took over).

Gently pull the cup out of the leg at an angle. If the cup is too big to fit through the opening as is, you'll have to use your hair dryer to soften the vinyl of the leg. This will allow the cup to pop out. (If you want to see a demo of this, click the above link and watch Sarah's video) As it turned out, we didn't need to use a dryer on Emily; the cup came out nicely without it.


Now, take one of your Goody elastic bands and cut it in one place.

Put the elastic band through the hole of one brass insert. Using crimpers or pliers, squeeze the brass insert until it tightens around the elastic. (A word of caution: if you use crimpers, be careful not to squeeze all the way through the brass insert and make a hole, or it may not do what it's supposed to!)


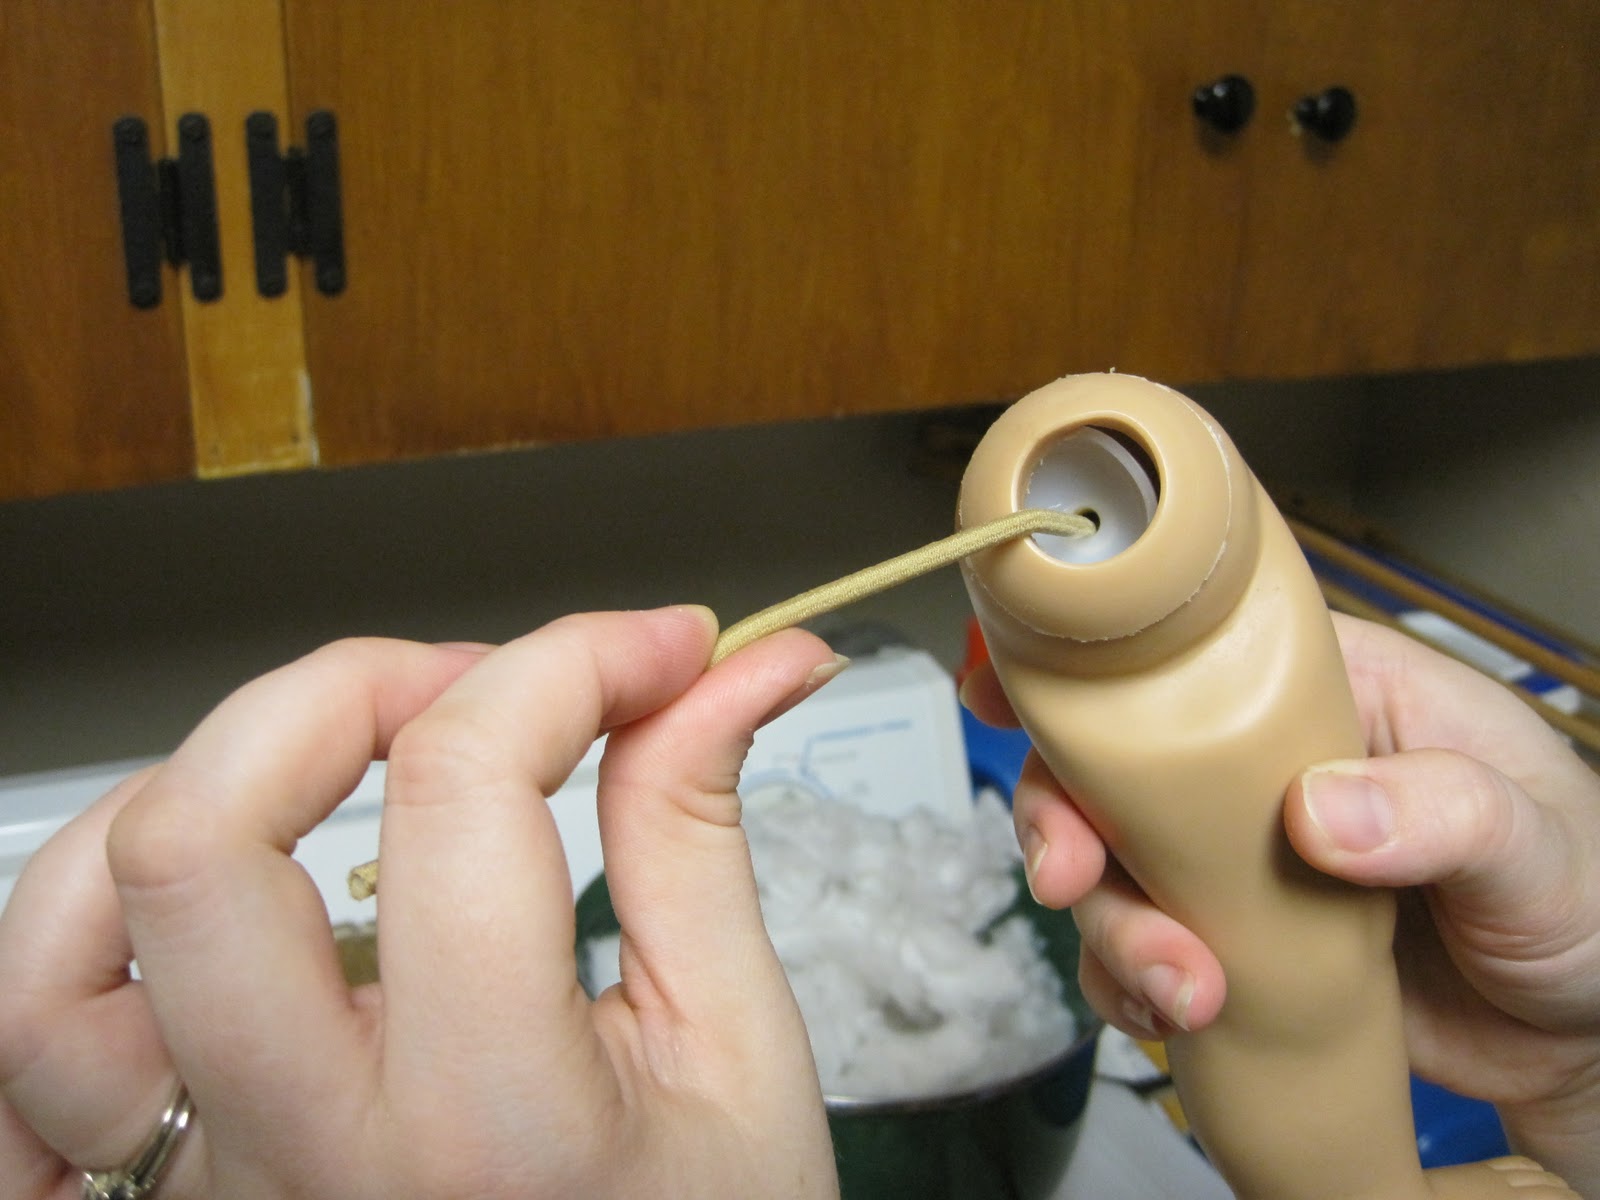
Poke the elastic through the hole in the plastic cup (the one that was inside the doll's leg). The wider end of the brass insert should be against the bottom of the cup, as shown in the picture. You can trim the excess elastic from the small end of the brass insert.
Carefully place the elastic, including the cup and brass insert, into the leg hole. Once again, putting it in at an angle will help it fit better. If it won't go back in, you'll have to use the hair dryer again. Be sure to keep ahold of both the cup and the elastic, or you'll drop the elastic into the leg cavity. Then you'll have to start over! :}


Once the elastic and cup are in the leg, you need to thread the elastic through the leg socket in the bottom of the doll's cloth body.


Get the leg as tight as you can in the socket, then put the elastic through the other white cup (set aside from before), with the open side of the cup facing down.

Take the other brass insert and thread the elastic through it. The bigger end of the brass should be against the white cup, as demonstrated in the pic.

Get the brass insert as close to the plastic cup as you can, and then use crimpers or pliers to squeeze the brass around the elastic. When the elastic doesn't slide through the brass insert, it's tight enough. Cut off the excess elastic.


So, that's as far as we got. My part two post will be much shorter, since doing Emily's other leg will be exactly the same, and I don't want to bore you with duplicate pics. Hope you enjoyed this post...be sure to tell me what you think, or share some of your own doll projects! :)

Poor Emily, waiting for her other leg!!
5 comments:
My Kaya needs to have her legs restrung, but I'm not sure that I'm brave enough to do it myself. I may just send her to AG:)
We have never needed the hair dryer before either .. only for changing eyes out which is a HUGE job .. at least for my hands ..
You are doing good .. keep up the good work and have fun restuffing all the stuffing it is a pain for sure .. LOL!!
Laters,
TracAn
Hi gals! Thanks for commenting! :) I totally understand about the bravery thing, Nutti Netti. It took me FOREVER to work up the courage to do this. It's nice you have the choice of the AG doll hospital; my doll isn't AG, so I was left with no other option! :}
TracAn, I'd be really interested in at least hearing how you do eye replacements. I have 3 dolls with really bad cases of cloudy pupil (all Gotz dolls, so they can't go to the AG hospital). I had a look inside Emily's head and got the idea it was pretty complicated, but I'd still be curious to know what you do (if you're willing to share). :)
I finally took the time to read this. I am so thankful that you have this! My daughter has a couple of dolls that need tightening but she is not brave enough to let me do it. Now, rewigging scares me to death. please keep this up for awhile because eventually I will need this.
Susan
Glad you enjoyed the post, Susan. And don't worry, I'm not planning on taking it down any time soon! :)
Post a Comment