Saturday, April 30, 2011

150th Post...A Disney Blog Party! :D

Yay!! It's finally here!  My 150th post! :)  I wanted to do something really special for this particular post.  As I was trying to think of something creative, I thought back to how much fun so many of us had participating in Kellie's "Literary Heroine Blog Party" on A Maiden's Musings.  So I thought, "If I did a blog party, what type would I do?" 

It didn't take me long to figure it out...and obviously you know what I came up with, if you read my title.  Welcome to Never Grow Up's "Disney Blog Party"! :D

Here's how we'll do it.  I'm going to put a list of Disney-related questions on this post.  I'll be focusing primarily on animated films (hand drawn or computer animated), but if you have a live action flick you just have to talk about, feel free. ;)  Anyone who wants to participate is welcome to do so. :)  You can answer all of the questions or pick and choose the ones that apply to you.  Once you've finished, be sure to leave a comment on this post so I can come visit your blog and see your answers.  If you'd like, leave a link to your blog in the comment so that others who participate can see too.  That was one of the most fun parts about the Literary Heroine Blog Party, seeing everyone's answers. :)  I even made some new blogging friends by taking part! :)

Another thing:  I've made some buttons to let others know about my Disney Blog Party (featuring my two favorite Disney movies, of course!).  You'll find them at the bottom of this post.  If you'd like, grab a button and put it on your blog.  I'd love to see how many people we can get to participate! :)

So, without further ado, here are your questions:

1.  What is your all-time favorite animated Disney film and why?

2.  What is your all-time favorite Disney/Pixar film and why? [Note:  I realize that questions 1 and 2 may overlap...I just thought this would make it easier for those of us who have favorites in both categories. ;}]

3.  What was the first animated Disney film you remember seeing?

4.  It's talent night at your school/job/etc...You have to perform a Disney song.  Which one would you choose?

5.  Name your top 4 Disney heroes or heroines (or any character, for that matter) and talk a little bit about why you admire them.

6.  Who, in your opinion, is the most hideous Disney villain of all time?

7.  If you could spend a day with any Disney character, who would you choose?  How would you spend your day?

8.  Which Disney character is the most like you?

9.  What, in your opinion, is one of the greatest movie moments in an animated Disney film?

10.  If you could pick which film Disney would make next, what would the film be?  

Well, there they are:  your 10 Blog Party questions.  The party starts today and will end in one week, on Saturday, May 7th (I may extend the blog party if I think we need more time).  I can't wait to see everyone's answers! :)  I'll be posting mine sometime in the next few days, but I wanted to make sure everyone had a chance to read this post first.  Oh, and I almost forgot.  Everyone who participates will be automatically entered in a drawing for my sketch of Belle and the Prince, featured in my header, and in this post.  I'll announce the winner the day after the Disney Blog Party ends and get the winner's mailing info.  So anyone under 16, make sure it's okay with your parents to be a part of the giveaway.  And to any participants, if you'd like to answer the blog party questions without being entered in the drawing, just let me know in your comment. :)  Please don't put any personal info in your comments on this post, because I want everyone to be able to see them.  I'll get your email at a later time if you're the winner. :)

Now, start thinking about your Disney trivia! :)


YAY!!! I finally got my blog buttons working!  They just take you to the home page instead of this specific post, but for now I think that's good enough! :)  I may try to change it a little later, but for now I'm just so thankful they're working!! :) 
 
After doing some research, I discovered that my button code included some "smart quotes" (the type of quotation marks that differentiate between beginning and ending quotation marks).  Apparently the HTML codes don't like these types of quotes.  I went through and replaced them with normal quotation marks and everything was fine.  Just thought I'd pass that info on to the rest of you! ;)
 
UPDATE:  I just realized that by limiting this party to bloggers, I may be excluding some people who'd like to join.  If you'd like to share your answers but don't have a blog, feel free to leave your answers in the comment section under this post. :)  You will be automatically entered into the giveaway, too! :)
Friday, April 29, 2011

The Dangers of EBay

Okay, guys.  Stay away from eBay!!!  It's just dangerous!  You're sitting there, browsing through things and find something you really like.  You think, "Hmmm, I'll just bid this one time and see what happens." 

You come back several days later (Who am I kidding?  You check it every day just to see if you're still winning!) and find you've been outbid.  It's the last day of the auction, and it's still a really good price.  So you think, "Okay, well maybe I'll just bid a little bit more.  Technically I shouldn't be spending this much right now, but I'm sure someone else will outbid me...and if I could win it for this, it would still be a really good price." 

Then you come back and discover you've won.  And then you get to try to figure out the best way to break it to your hubby. :{

Well, that in a nutshell is what happened to me on Wednesday evening.  As any of you who have read through my Wishlist page already know, I've been wanting to get a My AG #25 to be a middle sister for Emma and Charlie.  Well, I got my wish.  Piper Olivia will be here within a week or two to join her sisters!

I'm really excited, but feel kind of bad that I was taking chances on eBay like that, too.  I got her for an amazing price, but it was still more than I should have been spending at this point (it didn't help that I'd done bills that afternoon...nothing like bills to put things in perspective!).  Of course, as always, my hubby was very gracious about it.  He told me, "Happy Mother's Day"...and then proceeded to tease me about how many hours of work the doll would cost him.  :{

One exciting thing is that hubby was able to get me a $10 discount through Bill Me Later (only recommendable if you pay it off every month...very important to remember, folks!!!!).  I still have some things on AG Playthings for sale, so if those sell it will help pay for the doll.  And if worst comes to worst, I'll start selling off a few pieces from my Beauty and the Beast collection to make up for it.

Needless to say, I'm going to be a good girl for a while and stay away from eBay!!!  I'll be sure to do a big post when she arrives! :)


P.S.  This just happens to be my 149th post!!!!  I have something really special planned for my 150th post, so check back tomorrow to find out what it is! ;) 

Tess Loves Reese's!

The other day in Walmart (my favorite store!) ;)  I found these adorable mini Reese's Peanut Butter cups.  I realized that they'd be the perfect size for my dolls, so of course I had to buy a package!


Tess and I share several obsessions, one of them being our love of Reese's Peanut Butter cups.  Because of this, I thought that she'd be the perfect doll to model the scale of the Reese's. :)

Here's what the package looked like.  Tess really enjoyed the Reese's, but she informed me that this is one area where staying within scale doesn't matter.  She actually prefers the big people-sized cups! ;)  And as to where all of those Reese's minis ended up, I plead the fifth! :} [Just to clarify, this post was written before I started Weight Watchers...I've been saving it for a while.  I know, it sounds fishy, but you can believe it or not.] :)

Thursday, April 28, 2011

Doll Designer Jewelry from...Walmart?


Have any of you checked out the jewelry section in Walmart lately?  They have a great selection of anklets and bracelets for the summer.  One of them jumped out at me as the perfect necklace for Emma. :)  Silly me, I didn't take a pic of it in the package, but I got lots of pics with Emma modeling it.


After I opened the package, I realized that the anklet was actually three separate anklets.  I liked them best worn all together, though. 

There were lots of other great anklets.  Some had little miniature seashells on them, some were beads, and some were just plain silver chains.  I had to be good and just choose two.  The anklets were $4 each, and either came with multiple anklets or with toe rings.  I'm still trying to figure out what I could use a toe ring for on an AG doll. :} 

Overall, a great price.  I think Emma is very happy with her new "designer jewelry". :)

Oh, and for those of you who are interested, Emma is wearing the grey stretch capris from the American Girl JLY "Star Hoodie" meet outfit.  The shirt is from an African American Alexander Girlz doll from a few years ago.  Doesn't it look great with her dark hair and green eyes? :)

Wednesday, April 27, 2011

Weight Loss Progress

So, I figured it was about time I shared with you how my "weight loss journey" is going.  Let's just say Pita (aka Taani Esperanza Montoya...I think) is going to be pretty comfy at my mom's house for a while! :} 

I have taken some definite steps towards my goal weight, but it's just going to take some time.  I started doing Weight Watchers at home two weeks ago.  I'm not exactly sure how much I've lost since day one, because I forgot to weigh myself at the very beginning.  In the last week, though, I've lost 2 pounds! :) 

The first week was really rough.  I was STARVING, and as a result, really cranky with my family.  I'm past the stage where I feel like chomping on a head of lettuce, just so I feel full, so that's good! :)  I'm actually to the point where I feel very satisfied by the end of the day, and I'm already eating a lot less than I was before.  Hopefully, that difference will show up on the scale soon.

I also incorporated exercise, starting at the end of last week.  I began with just walking in place to a movie or music once per day.  On Monday, I got back to my 3 mile walk workout DVD by Leslie Sansone.  I really like her workouts because:
  1.  The women on the video are fairly modest (no crop tops)
  2.  I get a full-body workout without any floor work.  This is great for me because I have bad knees.
  3.  The music is not atrocious.
  4. It's not so involved that I have to be completely unavailable for my kids.

I got all the way through the 3 miles, which was really exciting since I haven't done it for a while.  I'm planning on doing it again on Friday.  Today, I did my Bollywood and Bhangra workout DVD.  I got all the way through the Bhangra section on the first disc.  I'd love to master this workout.  It's a fun way to exercise, and trying to complete it (and be able to do it well) gives me a doable goal.  I'm really glad no one was taping my workout today, because I know I looked ridiculous.  If I saw how silly I looked, I would probably never do it again!  As I keep working at it, though, I hope to improve. :)

So, I'm planning to continue on with Weight Watchers, the 3 miles twice a week, and the Bollywood workout once a week.  Eventually, when I'm a little stronger, I may do Turbo Jam again, at least once a week.  I'd have to do it after the kids were in bed, though.  Some of the moves are pretty suggestive, and half the girls are in skimpy clothing.  Plus, a lot of the songs they use are not songs I want my girls learning.

I'll keep you guys posted on my progress as I go! :)

My Custom Doll :) (WARNING: CONTAINS ANOTHER EYE REMOVAL!!)

All right, so everyone should have read my previous post about my first doll eye removal.  If you haven't, I would suggest reading that one before you read this one.  Once again, if you have problems seeing AG dolls in pieces and parts or without eyes, just skip this post now!!!! 

I got my two doll heads I'd ordered in the mail (the wigless TLC Sam head with brown eyes and the eyeless, wigless #25 head).  Feeling confident, and a bit unstoppable after my previous success, I bravely plunged into my next eye swap.  And this time, my hubby was on hand to take pics!

So, here's a pic of the TLC Sam head before eye removal.  I was pleased to discover that she actually had beautiful Pre-Mattel eyes with soft, brown lashes (the newer Mattel eyes have stiff, black lashes).

As before, I put Sam's head upside down in the same container and started boiling my water.


When the water was fully boiled, I poured it into Sam's head cavity and set my timer for 3 minutes.

After the timer went off, when Sam's head was nice and soft and squishy, I poured out the water. 

Then, using my wooden spoon handle, I pushed against the back of the eye cavity.  AG doll heads have special "pockets", if you will, that hold the eyes.  When the doll's head is nice and soft from the boiling water, applying pressure to these pockets will push the eyes out of the front of the head.

Sam's right eye is starting to budge...

...and here it's almost all the way out.

Next, I did Sam's left eye.

And, voila!  Both eyes are removed!  You'll notice that these eyes have a white plastic piece in the back instead of black.  That's because her eyes are Pre-Mattel.

Now, it was time to put boiling water in the #25 head.  I must admit, I made the mistake of pouring the still hot water from the first head back into this head.  This was NOT successful.  Even in that short amount of time, the water had lost enough heat that it didn't get her head soft enough.  I ended up having to start all over again with another pot of boiling water, and another 3 minutes with the water in her head.

After that, her head was nice and soft, as you can see from the above pic.  You want to get the head as soft as possible.  Be careful, though.  The plastic gets HOT!!

I had several experimental tools on hand to use to get the eyes in the right place.

I started to attempt to get the first eye in.  Man, it was a lot harder than I thought it would be!  After much pushing and grunting and fighting with it, I finally got the eye in.  It was in crooked, so I had to use the knife to gently turn the eye (being careful not to cut myself, remove paint from the eye or eyelid, or damage the eyelashes.  No problem, right?).  I found that the small, sharp knife I'd chosen worked the best for this.  [Kids, if any of you are reading this, DO NOT attempt this without help from an adult!!!]


And here she is with one eye in!  Unfortunately, the very end of her eyelashes got a little scrunched on one side.  I was a bit disappointed, but I knew I needed to get on with the other eye!  Back to the boiling water I went.  Another 3 minutes, and then...

...my, it was much harder with one eye in!  I couldn't squish the plastic of the face as much.  The eye holes were so much smaller than the eyeball itself, and it was really a chore. 

After one failed attempt, I boiled water again, let it sit in the head for another 3 minutes, and gave it another try...

...and tried, and tried.  Still no success, and this time, I lost grip on the eyeball and it went flying!  I actually had to fish one part of the eyeball out from under the dryer!  By this time, I was wondering why I had started this stupid project in the first place.

Once again, it was back to the boiling water and the 3 minutes, and then another attempt.  By now, my thumb was aching, I was grunting and groaning like a woman in labor, and still that stubborn eyeball refused to cooperate!

At last, I called in the big guns and asked hubby for help.  Even with all of his strength, it took him a couple of tries, but he finally got the eye in.  Then I started panicking because half of the eyelashes were stuck behind the eye socket! 

Thankfully, my husband kept a cool head and was able to get the eye turned around to its proper place.

And here she is!  It's kind of hard to tell, but her eyes are not exactly even.  It was a bit of a bummer to have a doll with a slight wandering eye after all of that work. :(  We think part of it may be the eye sockets themselves (they're shaped differently), and part of it may be the difference in the eyelashes (on one eye, the eyelashes have more of a natural curve).

After she was all finished, I grabbed a spare wig I had on hand and started taking some experimental pics.  Here she is with her hair parted in the middle and pulled back.

Here she is with a middle part and her hair loose and flowy.

For this pic, I tried a side part and a claw on one side.

This is my absolute favorite pic of her!! I love how it turned out...especially since she's looking away from the camera, so you don't notice her eye deficiencies!

A full view of her beautiful wig.

I learned a few valuable lessons from this project.  First, I do NOT like eye swaps.  I don't mind taking the eyes out.  That part's easy...and even a little fulfilling (sorry if that sounds morbid!). :}  Getting them back in, however, is a big pain!!  My thumb was sore for the rest of that day.  I think the worst thing, though, is that things have the possibility of going so horribly wrong!  Loss of paint, melted eyes, doll eyes trapped sideways in doll heads, ruined eyelashes...Let's just say there is no way I would attempt this on a doll that was special to me!  I'll leave that for more talented doll customizers.  And at least since joining AG Playthings I have a whole list of people I could contact for such projects. :)

The other thing I learned is that, while customizing my own doll was fun, I just really want a normal #25, made by American Girl.  I've decided I'm going to hold out for one, even if it means that Emma and Charlie are without a sister for a while.  I can wait.  That specific doll is the one I want, not a customized doll.  

And finally, I learned my limitations.  It was a little disheartening to learn that I wasn't completely invincible.  I think it was good for me, though.  Now I know that I need to avoid buying dolls with eye problems unless I want to send them to someone else.  It's possible that I might consider trying this again on a doll I found for $2 or $3 somewhere, but other than that, I'm sticking to re-wigging and re-stringing, when I'm in the mood.  And maybe removing eyes for someone every once in a while, just because that's something I CAN do. :)  

A New Doll Project: Eye Removal (not for the faint of heart!) :}

*WARNING!!!* If you are extremely sensitive to seeing dolls taken apart, eyeless, wigless, or anything else, SKIP THIS POST!!!

NOTE:  This was an earlier post that I did and was waiting to publish.  Now, I have a newer doll eye removal post with better pics that I'm working on.  Although some of the info may be the same, I figured there was enough here that you might still appreciate this post...if you can stomach it, that is! :}  I should have my new eye removal/swap post up by some time this afternoon.

I finally attempted my very first eye removal on an extremely TLC doll purchased on Bonanza.com.  She was covered in makeup and perfume and some sort of hair product.  What a job!!  After doing lots of research on AG Playthings, I was ready to proceed with the operation! :)

I started by removing the doll's head and turning it upside down in a container that would hold it in place.

I boiled some water...

...and poured it into the empty head.  I set the timer for 3 minutes and waited.


I had two different wooden spoons on hand to use to pop out the eyes.

After 3 minutes, I poured the water out, and the head was squishy enough to remove the eyes (sorry, I didn't get any pics of the actual removal as I was by myself at the time). :(

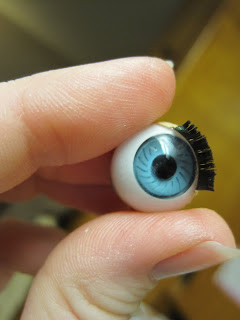
Here are some pics of the eyes.  They are made up of three parts.  The black plastic backing, the eyeball itself, made of plastic, that has a small weight attached to the bottom, and a lightweight silver ring that holds the pieces together. 

An eyeless AG head...eek!!!  (My daughters get really creeped out by this, so I only do these types of projects after they're in bed or when they're not in the room).

The eyeball itself has two little pegs on either side that fit into two little notches in the black plastic piece. This allows the eye to balance and also allows it to open and close.


The silver piece neatly fits over the entire eye and holds the two other pieces together.

There was sparkly makeup and other gunk on the eyes, so I used some rubbing alcohol to remove it (per an AG Playthings board member's suggestion).

The eyes cleaned up really nicely at first...


...but then they clouded over almost immediately after they were cleaned.  I'm told that either clear fingernail polish or sewing machine oil applied to the eyes is supposed to remove this.  I didn't find out for myself, as I decided to cut my losses with a smelly doll and sell her before I couldn't get my money back.  I've since heard, though, the the person who bought her from me had success removing the cloudiness with clear finger nail polish. 

Note...do NOT use the rubbing alcohol to remove makeup on the eyelid.  It took off the top layer of paint!   :{

Here's a close-up of the closed eye.

And here it is open.


Here are the three separate pieces.  Sorry, stinky Blogger was at it again, uploading my pics sideways!

And just a side note to all of you 18 and under, still living in your parent's houses:  PLEASE talk to your parents first if you're thinking about trying this on one of your dolls.  I would really like to avoid a bunch of irate parents, angry with me for encouraging you to take the eyes out of your precious (and expensive) doll.  I am doing this so that those of us who are courageous enough to try fixing dolls on our own can save a bundle on AG Hospital fees.  But just so you all know, I have not attempted this on ANY of my regular dolls yet, even though I have several with eye problems.  Eye removal can be very risky.  And putting the eyes back in can be very difficult, or so I've heard.  I haven't been brave enough to try it yet! :{

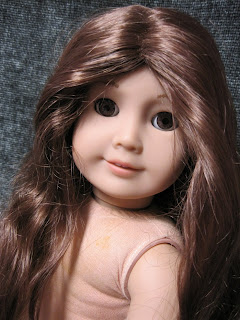
I have 2 AG heads on the way.  One is a very TLC bald Samantha head with brown eyes, and the other is a bald My AG #25 head with no eyes.  As any of you who have read my wish list know, I really like the My AG #25 doll, but I don't have the funds to buy one brand new (and even if I did, I just have a hard time spending $100 on a doll at this stage in my life).  A seller on AG Playthings had #25's head and body for sale, and when I saw the brown eyes for sale in the Sam head, I started putting the pieces together (no pun intended!).  What if I could, over time, gather the pieces I needed to build my own #25?  As long as I did it right, it should work out to be cheaper than a new doll.  And what a fun story it would make! :) 

I narrowly missed purchasing the body that goes with the #25 head (someone on AG Playthings purchased it before I could).  But, as long as the eye swap goes well, I should have a #25 head with eyes after all is said and done.  Now I just have to locate a body and a wig, and I'll be set! :)
I'll keep you all posted on my evil plans! >:)