Showing posts with label sketch. Show all posts

Tuesday, March 18, 2014

Announcing Never Grow Up's "Frozen" Blog Party!!

Hey everyone!  Sorry you haven't heard from me all weekend.  Things have been busy and I've had a lot of computer issues.  I'm still fighting with my desktop daily, but I'm going ahead with the blog party as planned.

Also, a huge thank you to the three of you who nominated me for the Liebster Award.  I'm hoping to get to those questions soon, but I wanted to go ahead with my plans for the week while I had the chance! :)

I'm very excited to announce that today is the official beginning of Never Grow Up's Frozen-themed blog party!!  We're starting today in celebration of Frozen's release on Blu-ray and DVD, which I will be buying later this afternoon. :D  I have a great week planned, including giveaways, questions to fill out, and posts in keeping with the theme! :)

For starters, I thought I'd share a mini tutorial of my fan art I drew for my header:

I started with some Frozen Valentines and a very rough sketch...  

 ...then started filling in the details, slowly but surely.  

I was thrilled with how Elsa turned out! :D 

 Here she is next to the Valentine I used as a reference.

I erased my temporary features from my rough sketch of Anna and then started again.

I was pretty pleased with how she turned out, too.

I changed the position of her pupils because I wanted her looking at Elsa in my drawing.  Anna's head angle was a rather difficult angle to replicate.  I definitely found it more challenging than Elsa.

Here's the finished sketch...

...and then a closer look.

As always, I did the "backwards test" (looking at the picture backwards against the light).  They still looked pretty good, so I knew I hadn't done too badly with my proportions. ;)

I recently purchased a set of art pens at Michael's which I have been thoroughly enjoying. :)  Here's the one I used to trace Anna and Elsa.

Here they are, all traced and ready to be cleaned up with an eraser.

I was a bit disappointed with Anna's mouth and nose, and I also ended up giving her an extra chin line.  My problem was I doubted myself and changed her look while I was tracing (not usually an advisable thing to do).  I knew I'd have to work that into the shading somehow so I wouldn't make her look too odd. :}

And here they are with all of the pencil erased.

A closer look again.

 I ended up using a combination of colored pencil and markers this time around, basically because I didn't have the right skin tones for the girls in my markers.

 I also liked using the colored pencils to give Elsa's eye makeup and facial features a softer look. 

Her hair was a bit tricky, but I finally decided on using a tan-colored marker and a blue colored pencil.  I think it worked out just right. :)

 Even after adding color, I was still disappointed with the way Anna turned out.  Between my flub on her chin and messing up her lips, she just didn't come out quite the way I had hoped.  I almost wish I'd kept her as a pencil sketch...I liked her much better before I traced her.  Oh well, live and learn. ;)  This is only the second time I've drawn Anna, so I'll figure her out eventually. ;)


It was really fun playing around on Ribbet.com with all of the special effects and such.  I'm quite pleased with the way the header turned out, and I can't wait to try out more Frozen fan art! ;)

And while we're on the subject of art, I have to head out to my art class, but stay tuned for more fun!  I'll be announcing the giveaways and putting up party questions within the next day or so, and I will also have a blog button for the party up as soon as I possibly can.

Talk to all of you again soon! :)

As always, here's a copy of my previous header. ;)

Thursday, January 9, 2014

Sketching with Beast'sbelle: Kristoff and Anna

Okay, so my plan for today was to do some writing on my book.  However, when I ended up with two sick kiddos, that plan became slightly less practical, so I did some drawing instead. :}

Really, I should be doing one of my promised posts right now, but I was too excited to wait to share my drawing with you. :}  This is the first time I've attempted to draw any of the characters from Frozen, and I'm quite pleased with the result. :)

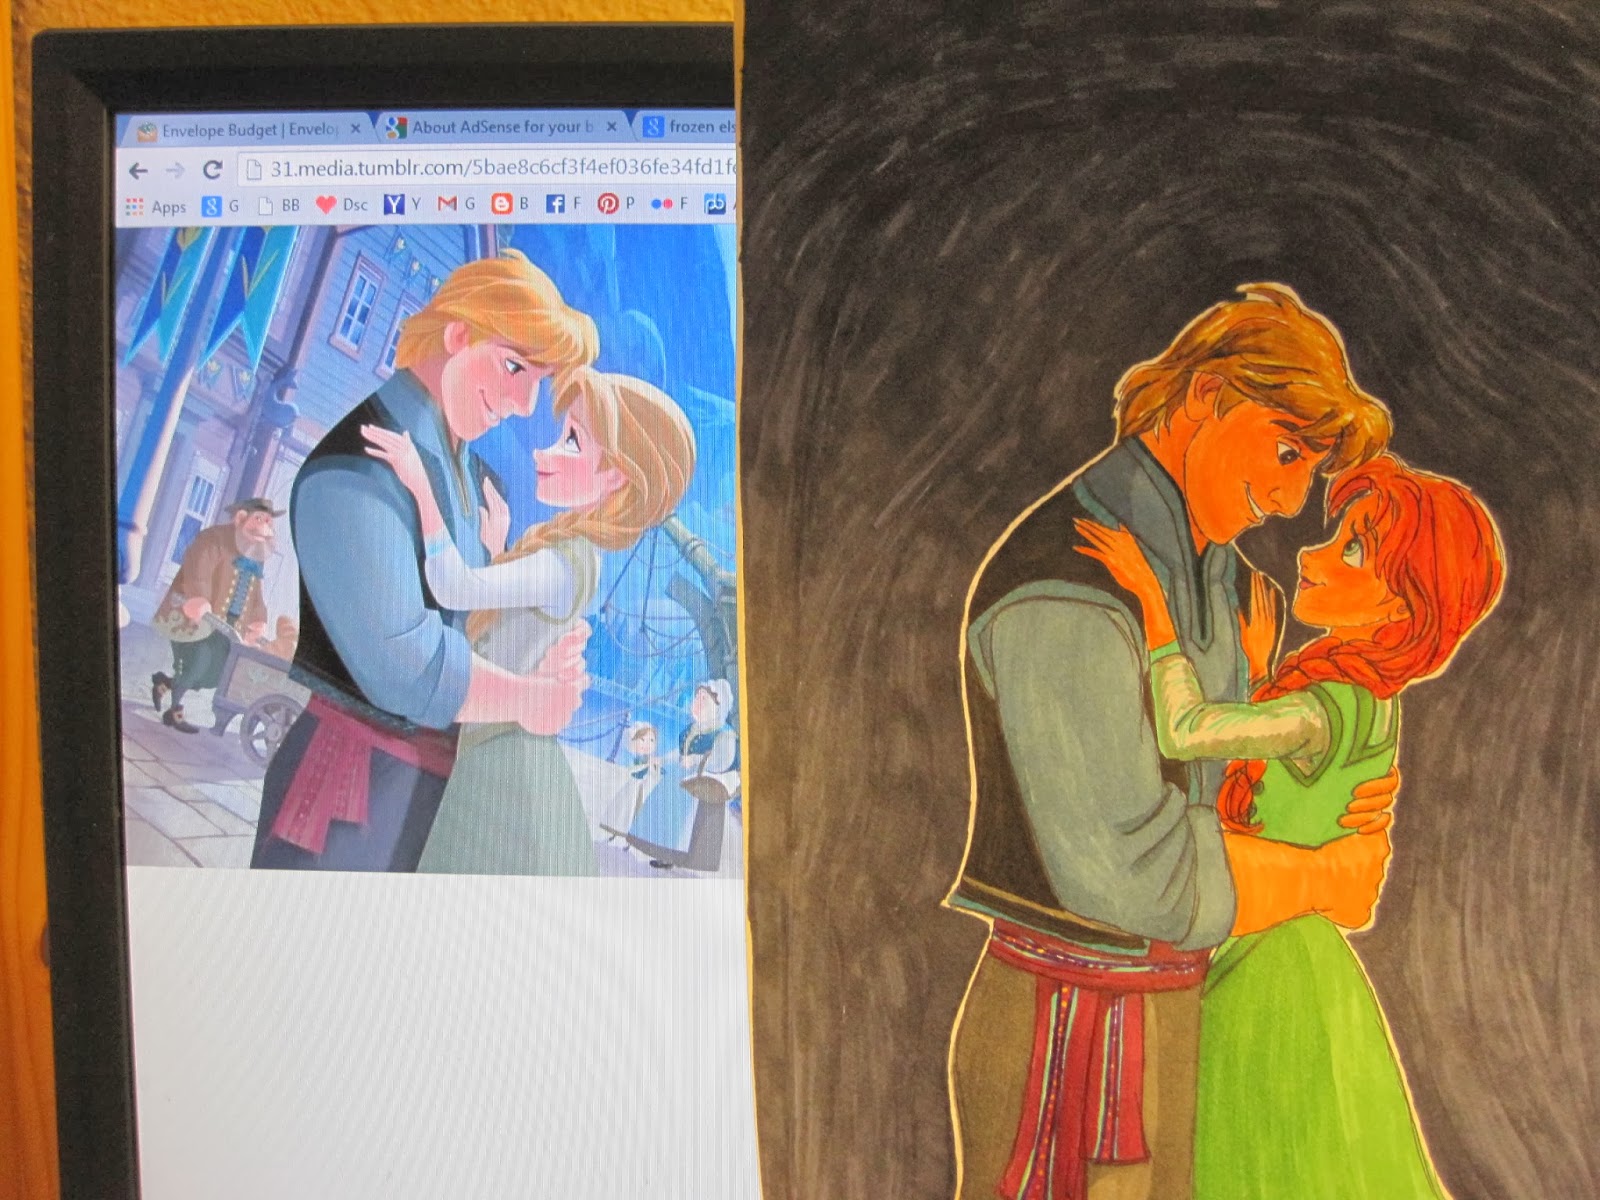
I started by Googling Frozen images.  The one shown above has always been one of my favorites, so I decided to try replicating it.  I found the image HERE.

Because it can be difficult to copy a picture that's upright on a screen, I decided to print it out as well.

I started with a very basic outline.  I really hate doing this (I'm too impatient to do things correctly), but it does at least give me a good goal to shoot for.  Besides, I've been teaching my elementary students all about the basic shapes that make up the building blocks of our drawings.  I felt like I should probably practice what I preach. ;)

And then I totally changed it because Anna and Kristoff were NOT cooperating at all. :}

Experimenting with arm angles.

This is what I ended up with at the end of the sketching session.

I decided I wanted to color the picture this time around, so I outlined it in pen.  I really need to get some new fine point Sharpies or something along that line.  They work so much better for tracing artwork than ball point pens. :}  At least I was drawing on computer paper instead of sketchpad paper this time. :)

This is the point where I always hesitate and think, "Do I really want to color this, or just add some nifty shading?"  When you erase the pencil and add color, there's no turning back, and you can really mess up a good drawing. :}  I guess I'm a glutton for punishment, though, because I kept going. ;) 

I was able to erase all of the pencil, but was irritated to discover that my eraser left an odd little red rub mark on the page right between the two faces.  It would NOT come off. :{  Oh well...moving on.

I thought that this would be an excellent opportunity to use my incredible new Sharpie set I got for Christmas (thanks, Mom and Dad). :)

I also decided to supplement with my trusty Pentel Color Pen set. :)  (Sorry for the annoying sideways upload...Blogger hasn't done that to me in a while!)

So, between this picture and the last were a few hours of experimentation and struggle.  I thought I took some pictures of the process, but apparently I was "in the zone" a little too much to think about documenting every step. ;)  

I made a couple of discoveries when coloring these two.  First, they have a pretty difficult color palette when you're dealing with basic markers.  I found Anna's hair especially challenging.  The color you see above was a result of several experimental layers of marker from both sets. :}  She has goldenrod, two shades of orange, yellow orange, and even a light brown in there.  Kristoff's hair was much easier, but still required a bit of trial and error.  I also need a better skin color.  Both Anna and Kristoff have much fairer skin than what I gave them, but that was the lightest skin tone I had.

Their clothing gave me some trouble, too.  The colors were pretty difficult to match, and some of them I just had to change altogether.  If you compare my finished picture with the picture I used as a reference, you'll see some pretty major differences.  If you just look at my picture by itself, it's not so bad. ;)

The other thing I discovered while drawing these is that Anna is REALLY hard to draw in profile.  She and Elsa both have a very exaggerated profile with a big, sloping section between forehead and nose, and their little button noses and mouths poke out at a rather odd angle.  My Anna ended up with a slightly different profile simply because I couldn't get her to look right in my drawing when I tried to draw her faithfully. :} 

Overall, though, I was pretty pleased with how it turned out...

...except for that annoying red smudge!!  I know it's not really that big, but this is where my silly OCD perfectionist side comes out. :}  I knew it would bother me every time I looked at the picture.

Aww...they're so cute...wait, what?  What's that smudge there? ;)

So, my only choice was to color in the background around them.  I left a slight white edge around both of them so they wouldn't get lost in the backdrop (I was especially worried about Kristoff's dark vest disappearing into the dark background), selected a nice, deep color from my Sharpie set, and went to work.  Listening to the Frozen soundtrack while I worked made it go a lot quicker (normally I'm far too impatient to fill in a whole background!).

I actually started with just a thin border around the two, but I kept enlarging it 'til I got to this point.  Then I knew I would never get the arch perfectly even...

...so I decided to fill it in all the way.  The weird, unfinished edge on the bottom will probably drive me nuts, too, so I'll probably end up either adding to it or trimming the picture.

One cool thing was that the picture looked pretty good from the opposite side, too (something I always check to see how I did on proportions; if it looks normal from both sides, you did pretty well). :) 

I think Anna's arm might be a little short, or her head might be a little big, now that I'm looking at it repeatedly, but overall I'm super pleased with how it turned out, especially since this was the first time I'd drawn any of the characters.


And here's a side-by-side comparison.  Definitely a different color palette, but not too bad.  In my defense, Anna's hair is a little lighter in the original picture than it is in the movie. ;) 

And this was the result of my art day on my computer desk. :}  I can't believe I didn't follow my own instructions to my kiddos and keep a spare piece of paper underneath!  Thankfully, most of it came up with a Lysol wipe! 

After I had finished, of course I had to stop by Ribbet.com and play around with some editing. ;)  I really like how these two look "winterized" with a Frost Frame. :)

I also decided to do a new header with my sketches, so here's a copy of my old one.  At some point, I will actually have a header that does not feature Frozen characters. ;)

Not sure how much time I'll have for more drawing (this one took me about four hours), but if I do try another one, I'd love to experiment with Elsa. :)

Talk to you guys later! :)

Wednesday, September 26, 2012

Sketching with Beast'sbelle: "Portrait of a Lady" ;)

Hey guys, sorry I've been MIA for a while.  My mom, sister-in-law, and I all had our combined birthday family dinner on Saturday, and things just haven't really slowed down since then.  Plus, this was one of those weeks where I've been behind on everything:  housework, the checkbook, blogging...you name it.  So instead of being responsible, stepping up to the plate, and getting stuff done, I chose to pig out on Weight Watchers ice cream bars and try out a new TV show, playing the total avoidance card.  Disappointing, I know.  I just like to remind you guys that I'm not perfect...I've got my issues to work on, too.  Thankfully, the Lord doesn't give up on me! (I sure would have by now!) ;)

Anyway, tonight I set aside some time to sit and sketch with my daughters.  It was so fun spending time with them, watching them create their own masterpieces, and teaching them by example.  It's been a while since I've taken the time to draw.  I really enjoyed myself. :)  I thought you guys might like to see what I ended up with. :)

So here's what I started with.  I was kind of going for the Regency period with the hairdo, albeit ultra romanticized. ;)  Hey, it was just for fun.  I'm not an art major or anything. :}

Details of the face...

...and the roses.

I went over the entire drawing in pen, which was quite a process.  Any of you who have ever used a ball-point pen to trace a drawing on sketch paper will feel my pain. ;)  I was especially frustrated trying to outline the roses!  

When I had outlined everything, I erased the pencil underneath.

Now for some color!  I decided to use colored pencils this time around.  I started by adding a light pink shade to her cheeks and a slightly darker shade to her lips.

Next I filled in her skin color.  After this picture was taken, I added some extra shading to her skin tone to make it more lifelike.

To add some definition to her eyes, I used light brown on her eyelid.  I colored her actual eyelid darker and gradually colored lighter until I reached her eyebrow.

I used green, blue, and brown for her eye colors.  I was going for a hazel effect.

Her hair was next.  I lightly colored a reddish brown underneath and then used the dark brown pencil to go over it.

Her headband and shawl came next.  I used various shades of blue.

For the finishing touches, I colored in the roses and used a goldenrod colored pencil for her earring and necklace.  

I'm pretty happy with the way she turned out, although her hair ended up a little wilder than I had originally planned. :}  Also, her ear is a bit off as far as placement, but the ear itself turned out pretty awesome!! :D

I'm normally super intimidated by ears, so I usually draw girls with long hair that covers their ears.  Tonight, I asked Middle Gal to model her ear for me. ;)  She did a super job...that's the best ear I've drawn in a long time! :)

Here are a few more detail shots: 

I'm not 100% satisfied with the roses, but I suppose they'll do for this time.

I think this red one is my favorite.  I didn't like how bright the red colored pencil was in this particular set, so I used the black colored pencil to tone the red down a notch.

Overall, I'm very pleased with how it turned out.  I've missed drawing just for the fun of it. :)  Plus, it's good for my ego.  My daughters have informed me that I'm the best artist in the world. ;)