All right, so everyone should have read my previous post about my first doll eye removal. If you haven't, I would suggest reading that one before you read this one. Once again, if you have problems seeing AG dolls in pieces and parts or without eyes, just skip this post now!!!!
I got my two doll heads I'd ordered in the mail (the wigless TLC Sam head with brown eyes and the eyeless, wigless #25 head). Feeling confident, and a bit unstoppable after my previous success, I bravely plunged into my next eye swap. And this time, my hubby was on hand to take pics!
So, here's a pic of the TLC Sam head before eye removal. I was pleased to discover that she actually had beautiful Pre-Mattel eyes with soft, brown lashes (the newer Mattel eyes have stiff, black lashes).
As before, I put Sam's head upside down in the same container and started boiling my water.
When the water was fully boiled, I poured it into Sam's head cavity and set my timer for 3 minutes.
After the timer went off, when Sam's head was nice and soft and squishy, I poured out the water.
Then, using my wooden spoon handle, I pushed against the back of the eye cavity. AG doll heads have special "pockets", if you will, that hold the eyes. When the doll's head is nice and soft from the boiling water, applying pressure to these pockets will push the eyes out of the front of the head.
Sam's right eye is starting to budge...
...and here it's almost all the way out.
Next, I did Sam's left eye.
And, voila! Both eyes are removed! You'll notice that these eyes have a white plastic piece in the back instead of black. That's because her eyes are Pre-Mattel.
Now, it was time to put boiling water in the #25 head. I must admit, I made the mistake of pouring the still hot water from the first head back into this head. This was NOT successful. Even in that short amount of time, the water had lost enough heat that it didn't get her head soft enough. I ended up having to start all over again with another pot of boiling water, and another 3 minutes with the water in her head.
After that, her head was nice and soft, as you can see from the above pic. You want to get the head as soft as possible. Be careful, though. The plastic gets HOT!!
I had several experimental tools on hand to use to get the eyes in the right place.
I started to attempt to get the first eye in. Man, it was a lot harder than I thought it would be! After much pushing and grunting and fighting with it, I finally got the eye in. It was in crooked, so I had to use the knife to gently turn the eye (being careful not to cut myself, remove paint from the eye or eyelid, or damage the eyelashes. No problem, right?). I found that the small, sharp knife I'd chosen worked the best for this. [Kids, if any of you are reading this, DO NOT attempt this without help from an adult!!!]
And here she is with one eye in! Unfortunately, the very end of her eyelashes got a little scrunched on one side. I was a bit disappointed, but I knew I needed to get on with the other eye! Back to the boiling water I went. Another 3 minutes, and then...
...my, it was much harder with one eye in! I couldn't squish the plastic of the face as much. The eye holes were so much smaller than the eyeball itself, and it was really a chore.
After one failed attempt, I boiled water again, let it sit in the head for another 3 minutes, and gave it another try...
...and tried, and tried. Still no success, and this time, I lost grip on the eyeball and it went flying! I actually had to fish one part of the eyeball out from under the dryer! By this time, I was wondering why I had started this stupid project in the first place.
Once again, it was back to the boiling water and the 3 minutes, and then another attempt. By now, my thumb was aching, I was grunting and groaning like a woman in labor, and still that stubborn eyeball refused to cooperate!
At last, I called in the big guns and asked hubby for help. Even with all of his strength, it took him a couple of tries, but he finally got the eye in. Then I started panicking because half of the eyelashes were stuck behind the eye socket!
Thankfully, my husband kept a cool head and was able to get the eye turned around to its proper place.
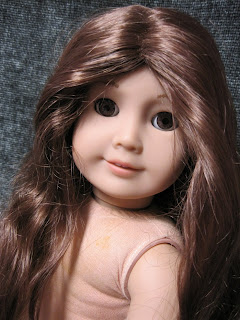
And here she is! It's kind of hard to tell, but her eyes are not exactly even. It was a bit of a bummer to have a doll with a slight wandering eye after all of that work. :( We think part of it may be the eye sockets themselves (they're shaped differently), and part of it may be the difference in the eyelashes (on one eye, the eyelashes have more of a natural curve).
After she was all finished, I grabbed a spare wig I had on hand and started taking some experimental pics. Here she is with her hair parted in the middle and pulled back.
Here she is with a middle part and her hair loose and flowy.
For this pic, I tried a side part and a claw on one side.
This is my absolute favorite pic of her!! I love how it turned out...especially since she's looking away from the camera, so you don't notice her eye deficiencies!
A full view of her beautiful wig.
I learned a few valuable lessons from this project. First, I do NOT like eye swaps. I don't mind taking the eyes out. That part's easy...and even a little fulfilling (sorry if that sounds morbid!). :} Getting them back in, however, is a big pain!! My thumb was sore for the rest of that day. I think the worst thing, though, is that things have the possibility of going so horribly wrong! Loss of paint, melted eyes, doll eyes trapped sideways in doll heads, ruined eyelashes...Let's just say there is no way I would attempt this on a doll that was special to me! I'll leave that for more talented doll customizers. And at least since joining AG Playthings I have a whole list of people I could contact for such projects. :)
The other thing I learned is that, while customizing my own doll was fun, I just really want a normal #25, made by American Girl. I've decided I'm going to hold out for one, even if it means that Emma and Charlie are without a sister for a while. I can wait. That specific doll is the one I want, not a customized doll.
And finally, I learned my limitations. It was a little disheartening to learn that I wasn't completely invincible. I think it was good for me, though. Now I know that I need to avoid buying dolls with eye problems unless I want to send them to someone else. It's possible that I might consider trying this again on a doll I found for $2 or $3 somewhere, but other than that, I'm sticking to re-wigging and re-stringing, when I'm in the mood. And maybe removing eyes for someone every once in a while, just because that's something I CAN do. :)


15 comments:
She is beautiful.
Thanks, Caelen. :)
She's so cute as a custom doll with that spare wig! Will you be keeping her, or selling her? I just love her. :)
Thanks, Claire. Good to hear from you! :)
I'm still deciding what I'll do with her. I'll keep everyone posted. :)
so now it's almost 2014 does anybody know anymore info about American girl eyes. I have heard there 10mm, 12mm, and 13mm an that it can be done but yet others say no I need another head to swap ugh this is aggravating me lol please somebody give me something correct
I'm so sorry, Anonymous. I don't have any information for you. I hope someone else can help!
If you're interested in joining a forum, you might try agplaythings.proboards.com. They have a whole section on customizing which I've found to be very helpful. :)
What is her name? She's lovely.
I don't think I ever ended up naming her, MyLittleMegara. I ended up passing her along to someone else. :)
Thanks for the great instructions. I fixed Elizabeth's eye yesterday following them. It turns out one of the little pegs that sits in the grooved notch of the cup was broken off, making her eye rotate to one side and sit deep in the socket. I fixed it by making a hole where the peg was and putting a toothpick in its place.
I found that when pushing the eye back into the socket, it was easiest by pushing it into the top first, then squishing it into the socket. It slipped it with only the silver part visible, but then, a little bit of maneuvering with the knife and mini screwdriver fixed that up.
Now Elizabeth has perfect eyes! Thanks!
the dolls eye's are in the same place as my eyes are kinda cool huh.
Cool! :)
Where did you get that beautiful wig? Its ythe most stunning one I've seen on a doll 😍
I found it on eBay. Unfortunately, it's been so long, I can't remember which seller I got it from! :{ Sorry about that!
I've found some great doll wigs from prillycharmin.com, and I've also heard good things about rubyredgalleria.com.
Hope this helps!
Any tips on what to do when your AG eyes get kinda stuck?
Anonymous, I don't really have a lot of experience with that, but I would recommend checking out agplaythings.proboards.com. It's an AG doll forum with tons of helpful information. I'm sure there are lots of folks on there who could help you. :) Sign up is free. You have to be approved first, but it usually isn't too hard to be approved and not too long of a wait.
Hope this helps! :)
Post a Comment